Preparing sourdough bread may seem complicated, but the most common mistakes can be avoided with a little attention. Here's what you need to know:
- Starter: If it is too active or too weak, the bread will not rise properly. Feed it regularly and monitor its activity.
- Kneading: Too little or too much can affect the texture. The windowpane test helps you check gluten development.
- Temperature: Fluctuations during fermentation lead to inconsistent results. Maintain a constant environment of 24-26°C.
- Water-flour ratio: Dough that is too hydrated or too dry affects the structure of the bread. Adjust the amounts according to the type of flour.
- Proofing: Incorrect proofing time leads to dense or collapsed bread. Check the dough's volume and elasticity.
- Shaping: Insufficient surface tension makes the bread spread out. Use proper folding techniques.
- Baking: Without steam or the right temperature, the crust can be soft and the crumb underbaked.
Every stage matters. With patience and adjustments, you'll get a perfect loaf with a crisp crust and airy crumb.
10 mistakes I made when baking sourdough bread. See the description. #sourdough #sourdoughbread
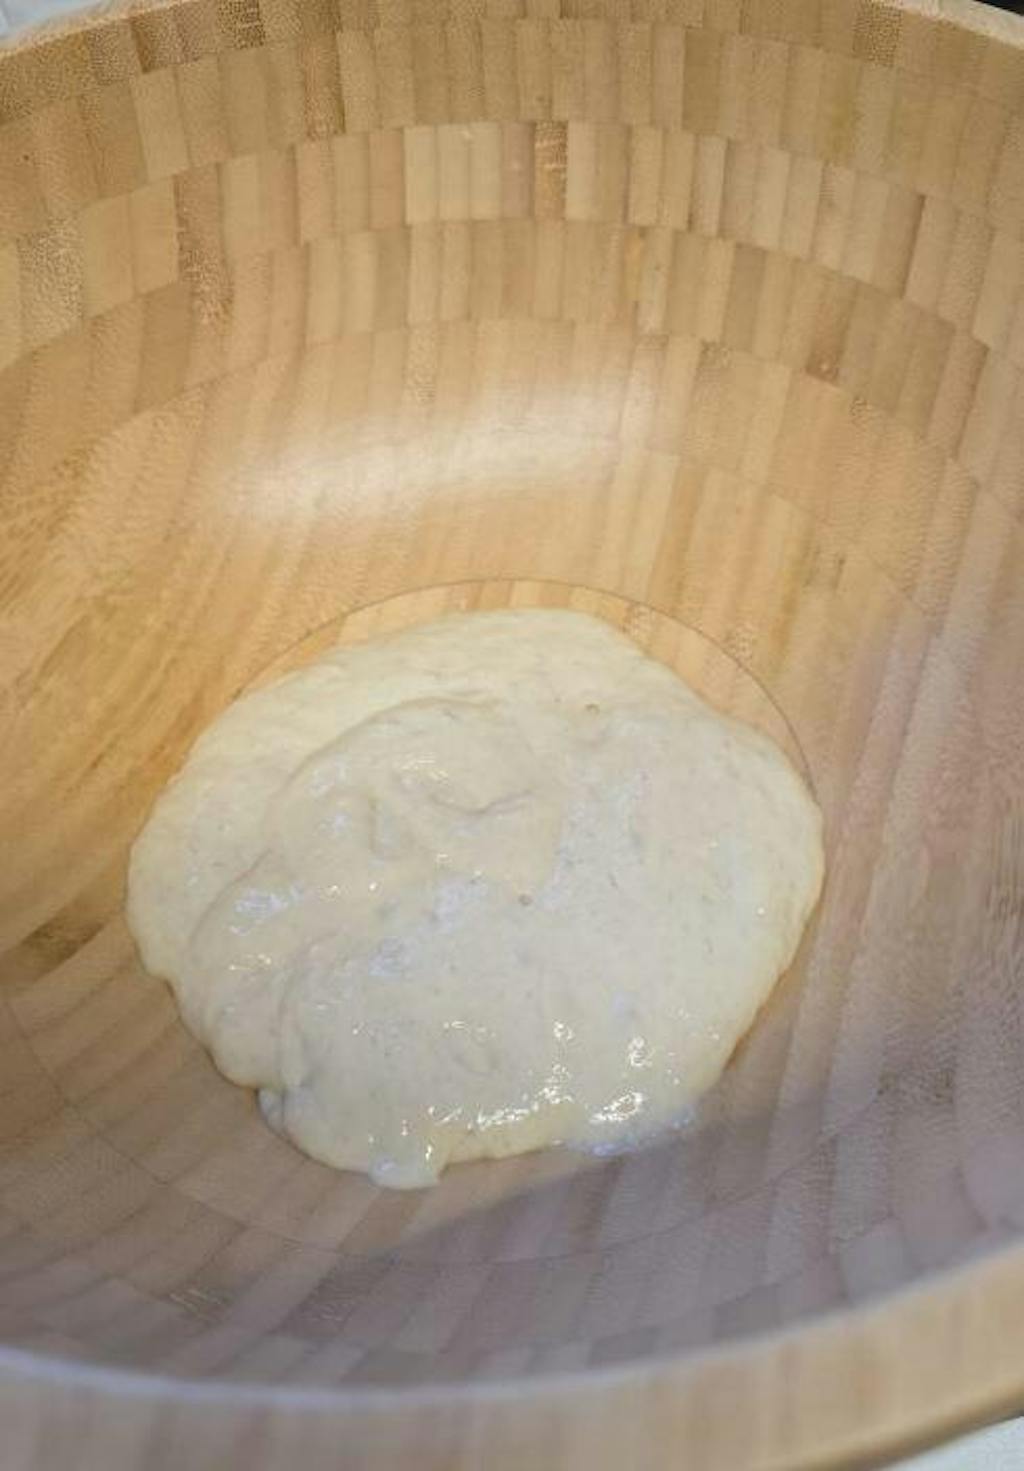
Mistake 1: Starter Too Active or Too Weak
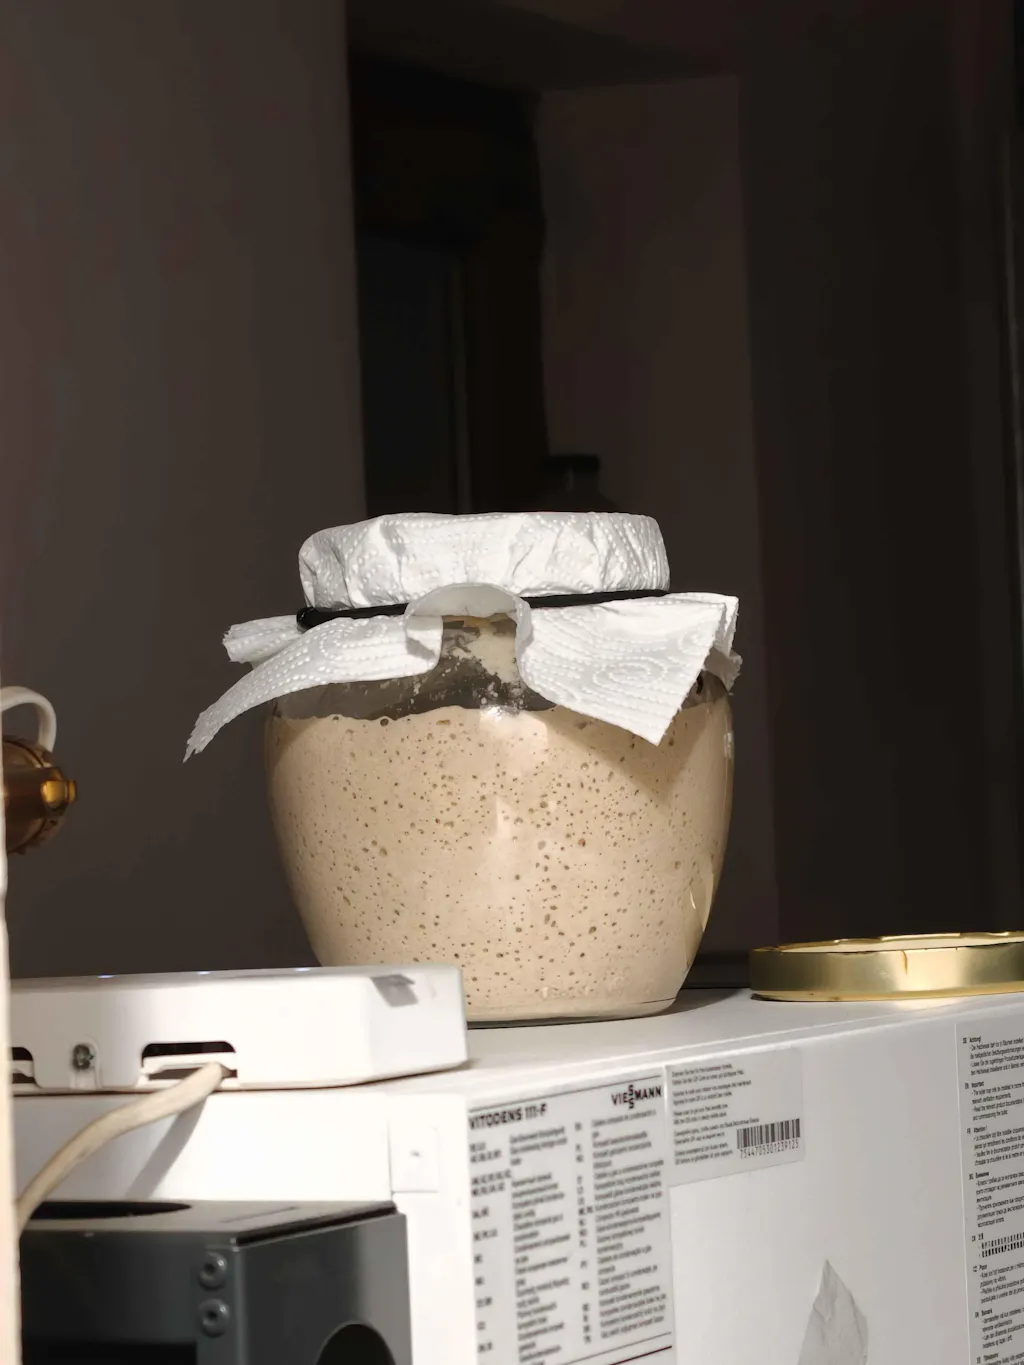
The starter is the essence of sourdough bread; its proper activity determines successful fermentation. Factors such as room temperature, feeding frequency, and hydration ratio can influence starter activity, making it either too active or too weak. Even a starter that has worked well for months can become unbalanced if there are changes in the maintenance routine or storage conditions. It's important to learn to recognize the signs that indicate problems.
How to Recognize an Overactive Starter
An overactive starter has over-fermented, consuming almost all the available nutrients. The most obvious sign is a strong vinegar smell, caused by the buildup of acids.
Visually, an over-fermented starter may have a liquid film called hooch — a gray or brownish liquid that appears when the yeast runs out of food. Gas bubbles become large and few, and the texture loses its spongy consistency, becoming watery. If the starter has risen and then fallen, leaving a thin line on the jar walls, that's another clear sign of over-fermentation.
If you use an over-fermented starter, the bread may have an unbalanced flavor, a dense crumb, and a weak structure, because the high acidity affects the gluten formation needed to trap gases.
How to Recognize an Underactive Starter
An underactive starter does not produce enough gas to lift the dough. You can check this with a simple test: place a teaspoon of starter in a glass of room-temperature water. If it sinks immediately, it means it is not generating enough gas.
The lack of bubbles in the first 4-6 hours or a failed float test are clear signs of a weak starter. Also, a healthy starter should double in volume in 6-8 hours at a constant temperature of 23-25°C. If after 12 hours it has barely risen or shows no activity, that is another sign of weakness.
A weak starter smells flat, without that slight acidic note, and its texture remains dense, without the airy, spongy look of an active starter. The result? Bread with a compact crumb and insufficient rise.
How to Adjust and Maintain the Starter
To keep a starter balanced, use a 1:1 hydration ratio and adjust feeding intervals (12-24 hours at 23-25°C) according to the ambient temperature. For example, if you add 50 g of flour, add 50 g of water as well.
- At higher temperatures (27-28°C), feed the starter more often.
- At lower temperatures (18-20°C), feeding intervals can be longer.
The amount of starter used also affects fermentation time. For a slow fermentation of 10-18 hours, which helps gluten development and improves flavor, use a smaller amount of starter — for example, 10 g of starter with 50 g of flour and 50 g of water. For a faster fermentation of 6-8 hours, increase the starter to 30-40 g for the same amount of flour and water.
A ready-to-use starter should be spongy and have a pleasant, slightly lactic smell. If the starter has reached its peak and then fallen, it is over-fermented. In this case, use less starter and feed it again with fresh flour and water to bring it back into balance.
These adjustments will help you keep the starter in good shape over the long term. Slower fermentations of 10-18 hours not only improve gluten structure and create larger holes, but also contribute to a more complex flavor, longer freshness, and better digestibility of the bread.
Mistake 2: Wrong Kneading Technique
Now that we've talked about the importance of the starter, let's move on to another crucial element: kneading. This is the stage that turns flour and water into an elastic gluten network, essential for a well-risen loaf. Without properly developed structure, the bread will be dense, without those air pockets that give the airy texture we're looking for. However, both under-kneading and over-kneading can compromise the final result. And the difference between the two can be more subtle than it seems.
Many people think of kneading as simply mixing the ingredients, but it involves more than that. Through kneading, the proteins in flour — glutenin and gliadin — combine to form gluten. This elastic network traps the gases produced by the yeast, giving the bread its airy structure. If the dough is too weak or too stiff, the final texture will suffer. Here's how you can identify improperly kneaded dough.
How to Recognize Under-Kneaded Dough
Under-kneaded dough is sticky and tears easily when you try to stretch it. A simple test to check gluten development is the windowpane test (windowpane test). Take a small piece of dough and stretch it between your fingers. If you can form a thin, translucent membrane without it tearing, the gluten is well developed. If the dough tears, knead it a little more.
Another sign is a lack of elasticity. If you press the dough with your finger and it does not spring back to its original shape, it means the gluten network is not developed enough. During fermentation, under-kneaded dough does not trap gases effectively, and the resulting bread will be flat, with a dense crumb and no holes. The texture will be compact, closer to a flatbread than a well-risen loaf.
How to Recognize Over-Kneaded Dough
Although less common in hand kneading, over-kneading can happen when you use a mixer or stand mixer. Dough that has been kneaded too much becomes stiff, rubbery, and loses its natural elasticity. Instead of being soft and easy to shape, the dough becomes hard to work with.
Signs include a shiny, almost translucent texture and a tendency to stick to the sides of the mixer bowl. Sometimes the dough becomes greasy and no longer absorbs water properly. In extreme cases, the gluten network breaks down completely, and the dough becomes soft and sticky, with no way to recover it.
Bread made from over-kneaded dough will have a dense crumb, a hard crust, and a rigid structure. Overworked gluten can no longer support expansion during baking, and the bread will not rise properly.
Proper Kneading: How to Get the Perfect Dough
For hand kneading, use the classic method: press the dough with the heel of your hand, fold it toward you, rotate it 90 degrees, and repeat. This process takes about 10-15 minutes for a dough with standard hydration (65-70%). The dough should become smooth, elastic, and no longer stick to your hands or the work surface.
If you use a mixer, set it to medium-low speed and knead for 6-8 minutes, checking the consistency every few minutes. Avoid high speeds, because they heat the dough and can damage the gluten.
Whatever method you choose, the windowpane test remains essential. Take a small piece of dough, wet your fingers, and slowly stretch the dough. If you get a thin membrane through which light passes, the gluten is properly developed. If the dough tears, knead it for another 2-3 minutes and test again.
For doughs with higher hydration (75-80%), the stretch and fold method is more suitable. Every 30 minutes during the first 2-3 hours of fermentation, wet your hands, grasp one edge of the dough, stretch it upward, and fold it over the center. Rotate the bowl 90 degrees and repeat four times. This technique develops gluten without compromising the dough structure.
After kneading, keep the dough at a temperature of 24-26°C. If the temperature exceeds 28°C, use cold water to prevent over-fermentation and weakening of the gluten. These details will make the difference between an ordinary loaf and a truly successful one.
Mistake 3: Temperature Changes During Fermentation
After you've kneaded the dough properly, the next important step is fermentation. At this stage, temperature plays a crucial role, as it can turn an ordinary loaf into something special or, on the contrary, ruin the final result. Many bakers ignore this aspect and let the dough ferment in any conditions, without paying attention to temperature changes. These fluctuations affect dough rise and final flavor, which makes thermal stability essential for a successful result.
Temperature affects both the speed of fermentation and the balance between yeast and bacteria. If it varies too much, the balance is lost, and the result can be bread with an uneven texture or unbalanced flavor. Let's see what the ideal temperature is and how you can keep it constant.
Ideal Fermentation Temperature
Optimal fermentation takes place at temperatures between 24-26°C. This range allows yeast and lactic acid bacteria to "work" together, producing carbon dioxide for dough rise and acids that give the characteristic flavor.
For different stages of the process, the recommended temperatures may vary slightly:
- Preferment: 24-26°C
- Bulk fermentation: about 25°C
- Starter activation: 26-28°C
At these temperatures, yeast multiplies steadily, and lactic acid bacteria produce organic acids that support gluten network formation. If the temperature drops below 20°C, microbial activity slows down significantly. On the other hand, if it exceeds 30°C, fermentation becomes excessively accelerated, leading to imbalances.
Problems Caused by the Wrong Temperature
When the temperature drops below 20°C, fermentation becomes slow, and dough that should rise in 4-5 hours may need 8-10 hours or even more. Although slow fermentation can develop more complex flavors, sudden temperature fluctuations lead to an uneven structure, with some areas over-fermented and others under-fermented.
At temperatures above 28-30°C, fermentation speeds up too much. The sugar in the dough is consumed quickly, and the gluten network does not have time to develop properly. In extreme cases, the dough becomes too soft and hard to shape.
Temperature fluctuations are a problem too. For example, dough left in the morning near a cold window and moved later next to a hot stove will ferment unevenly, affecting the final bread structure.
How to Keep the Temperature Stable
Keeping a constant temperature during fermentation does not require sophisticated equipment, but rather attention and a few simple tricks. The first step is to monitor the temperature of the dough and the room. A kitchen thermometer can be very helpful.
If the room temperature is too low, you can adjust the temperature of the water used for kneading. A simple formula for calculation is:
25 = 100 – (flour temperature + ambient temperature + water temperature + 5).
For example, if the flour is 18°C and the room temperature is 20°C, the water should be about 37°C to get a dough at 25°C.
To ensure a constant temperature:
- Choose a suitable place with a temperature between 22-25°C.
- Avoid areas with drafts or direct sunlight.
- A practical solution is to place the bowl of dough in a cold, unused oven, which protects it from drafts and keeps the temperature constant.
If you need more precise control, you can use an electric heating mat with adjustable temperature. It provides even warmth and prevents fermentation from being too fast or too slow.
In summer, when temperatures are high, use cold water to slow fermentation and protect the gluten network. If the room temperature exceeds 28°C, move the dough to a cooler place or even to the refrigerator for slow, controlled fermentation.
Constant monitoring is the key to success. Check the dough every 30-60 minutes during the first hours of fermentation. If you notice fermentation is too fast, move the dough to a cooler place. If the process stalls, give it a little warmth. Over time, you'll learn to "read" the dough's reactions and adjust the conditions as needed.
Mistake 4: Wrong Water-Flour Ratio
After mastering the maintenance of a constant temperature during fermentation, the next crucial step is to get the correct proportion of water and flour. This balance, known as hydration, affects the dough's consistency, how easy it is to shape, and the final texture of the bread. Many bakers ignore this aspect, resulting in dough that is either too sticky or too dry.
Hydration is expressed as a percentage and indicates the ratio of water to flour used. For example, a dough with 70% hydration means that for 1,000 g of flour, 700 ml of water is added. This percentage affects the bread's texture: higher hydration leads to a more open crumb and a crispier crust, but makes the dough harder to work with. On the other hand, lower hydration gives a dough that's easier to shape, but risks producing dense, dry bread.
A common problem occurs when the type of flour used is not taken into account. Wholemeal flour or flour with a high protein content absorbs more water than refined white flour. Using the same amount of water for all types of flour can lead to unpredictable results. Correcting this ratio is just as important as adjusting the temperature or kneading technique. Let's see how you can tell whether the dough's hydration is too high or too low.
Signs That the Dough Has Too Much Water
A dough with too much water sticks excessively to hands and surfaces, loses its compact shape, and flattens quickly. During fermentation, the internal structure does not develop properly, leading to uneven holes — some very large, others very small — and a gummy texture. The resulting crust is thin and pale, because excess water prevents caramelization.
A simple test is to take a small piece of dough and stretch it between your fingers. If it tears immediately or stretches too much without resistance, the gluten network has not formed properly. Also, overly hydrated dough tends to flatten completely after kneading, and in extreme cases, water can separate from the dough, forming small puddles on the surface.
Signs That the Dough Is Too Dry
Under-hydrated dough is hard to work with — it is stiff, tears instead of stretching, and does not fully incorporate the flour, leaving dry bits. Its surface becomes cracked, and kneading requires considerable effort. Even after 10-15 minutes of kneading, the dough remains stiff and does not become elastic, a sign that gluten cannot develop without enough water.
After baking, the bread is dense, with a dry crumb and small holes. It crumbles easily and dries out quickly, and the crust may be thick and hard to cut. Also, under-hydrated dough does not rise enough during fermentation, resulting in flat bread with no volume.
How to Get the Right Hydration
To avoid hydration issues, use precise measurements. A kitchen scale is essential for measuring both flour and water. Avoid volume measurements, because flour density can vary.
If you're just starting out, try a hydration of 65-70%, which offers a good balance between ease of handling and the final texture of the bread. As you gain experience, you can increase hydration to 75-80% for a more open crumb, but be prepared to work with a stickier dough.
Add the water gradually, keeping 50 ml in reserve for adjustments. It is easier to add extra water than to incorporate flour into an already formed dough. If you use wholemeal flour or flour with a high protein content (over 12-13%), adjust the water ratio, because these types of flour absorb 10-15% more water than white flour.
A useful technique is autolyse: mix the flour with the water and let them rest for 30-60 minutes before adding the starter and salt. This method allows the flour to absorb the water fully, and gluten starts to develop naturally, making the dough more elastic and easier to work with.
Last but not least, the water temperature matters. Warm water (28-30°C) helps dissolve the flour and speeds up gluten development, while cold water can slow the process, which is useful on hot days to control fermentation.
sbb-itb-cb8797a
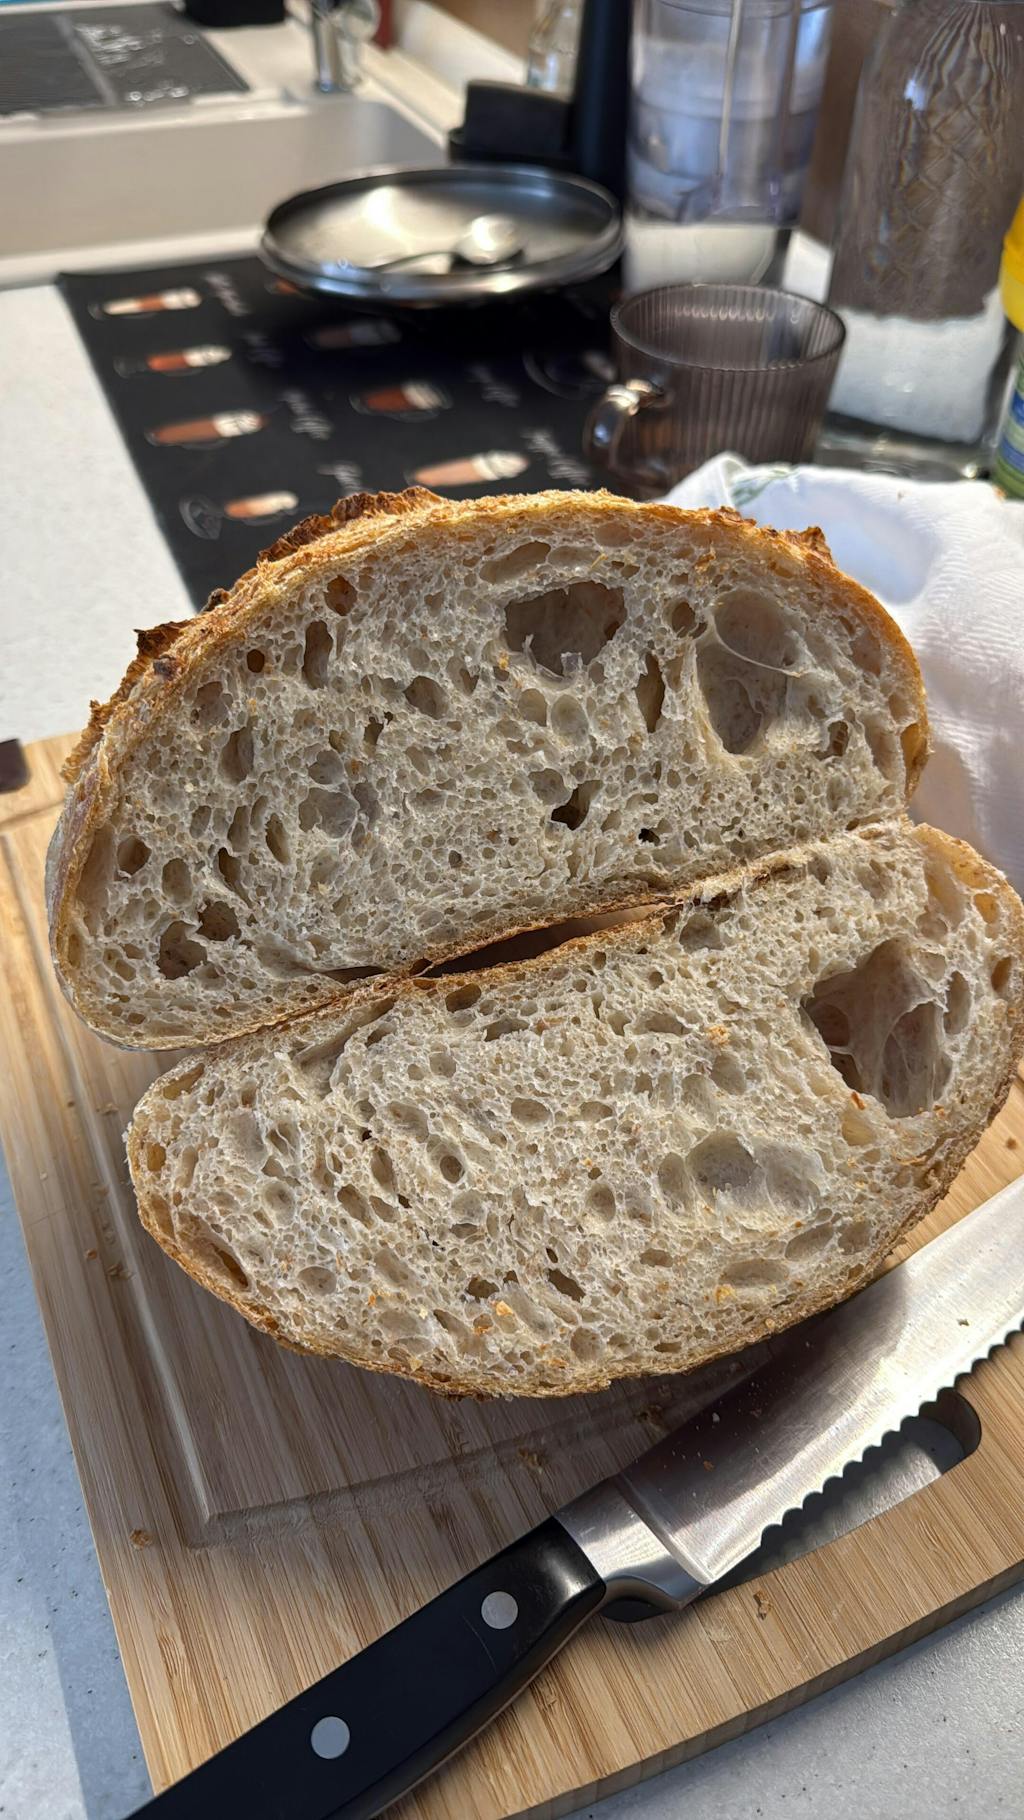
Mistake 5: Proofing Too Long or Too Short
After you've achieved perfect hydration, the next crucial step is to identify the right time for proofing. This process, essential for a successful loaf, requires constant attention and adjustments. Proofing time directly affects the dough's texture, volume, and flavors.
Proofing has two main stages: bulk fermentation (bulk fermentation), when the dough rises in the bowl, and final proof, after shaping. Each stage has its own distinctive signs, and a mistake in either one can ruin the result, even if everything else was done correctly. Below are the signs of under-proofed or over-proofed dough and what you can do to correct the situation.
At a temperature of 24-26°C, bulk fermentation usually lasts between 4 and 6 hours. However, time is not the only indicator — you need to learn to read the dough and recognize the visual signs of proper proofing.
Signs That the Dough Has Not Proofed Enough
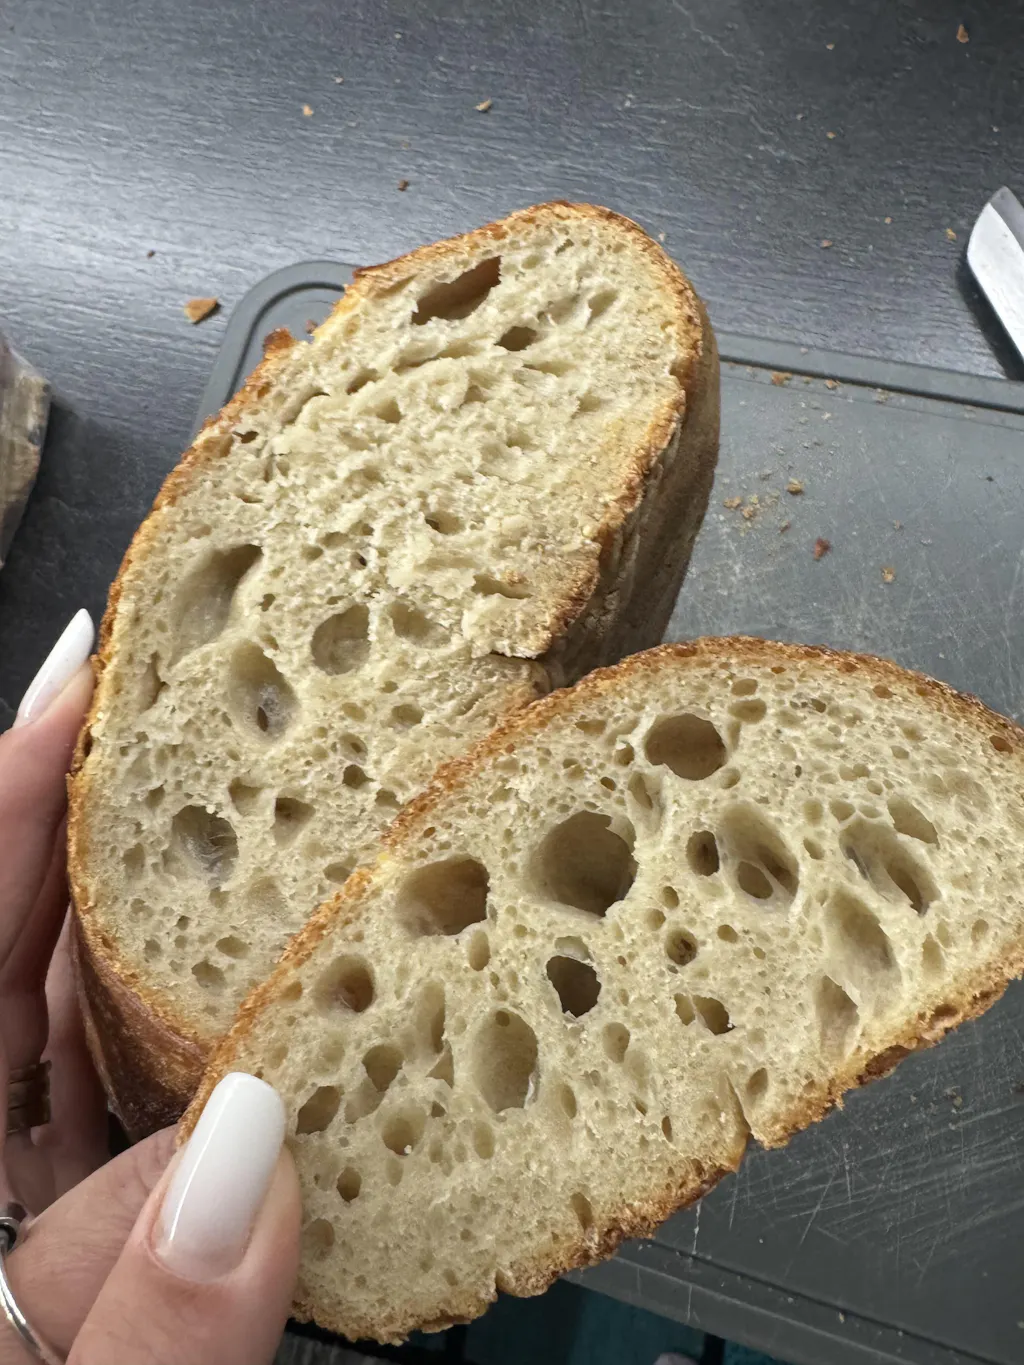
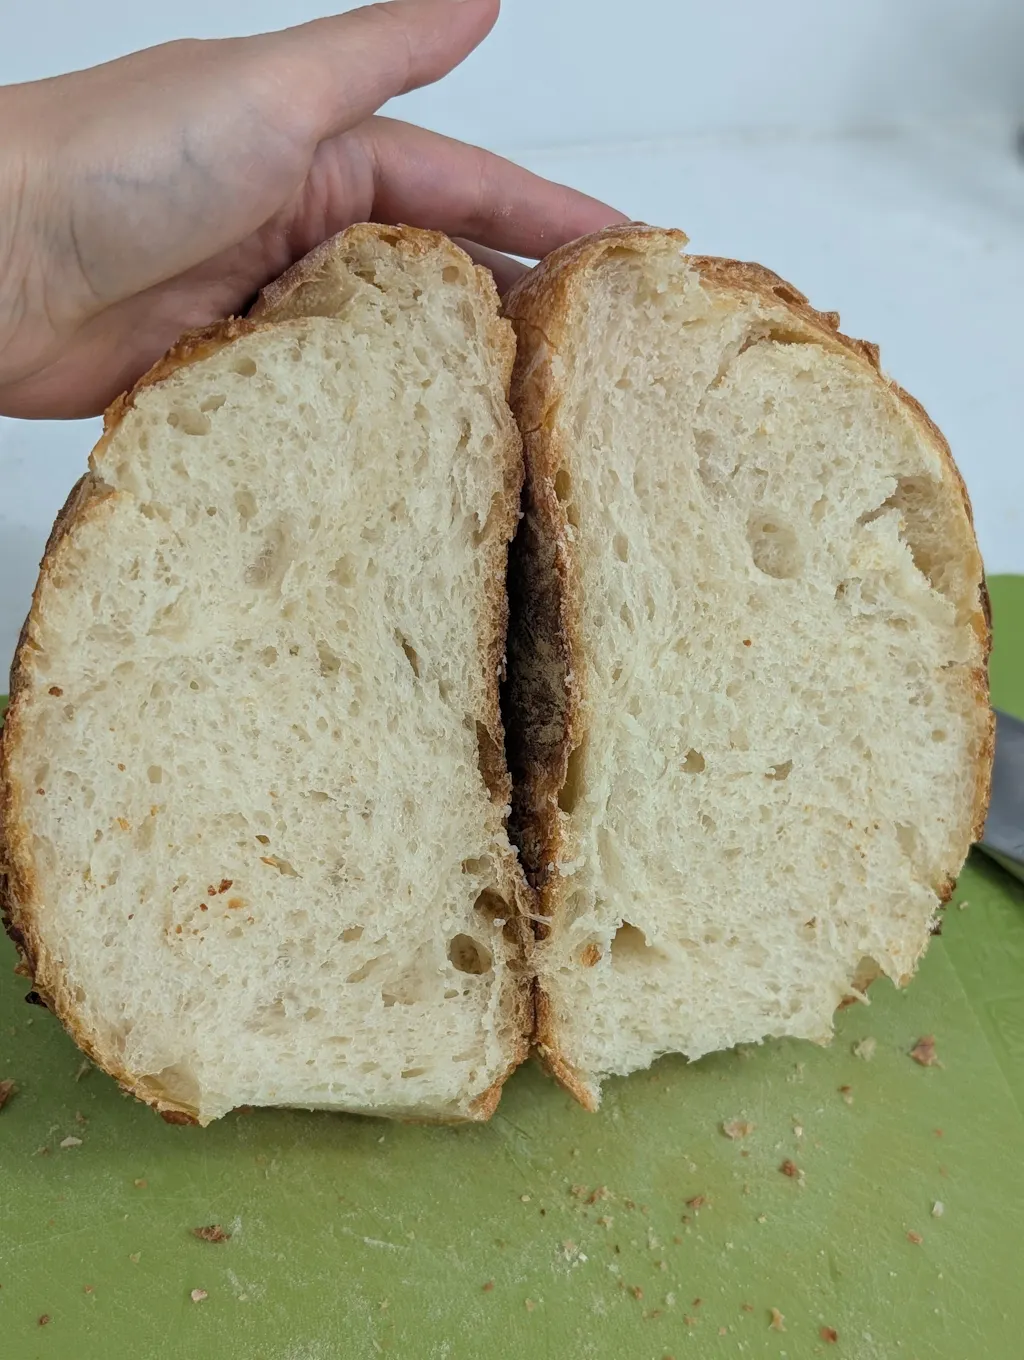
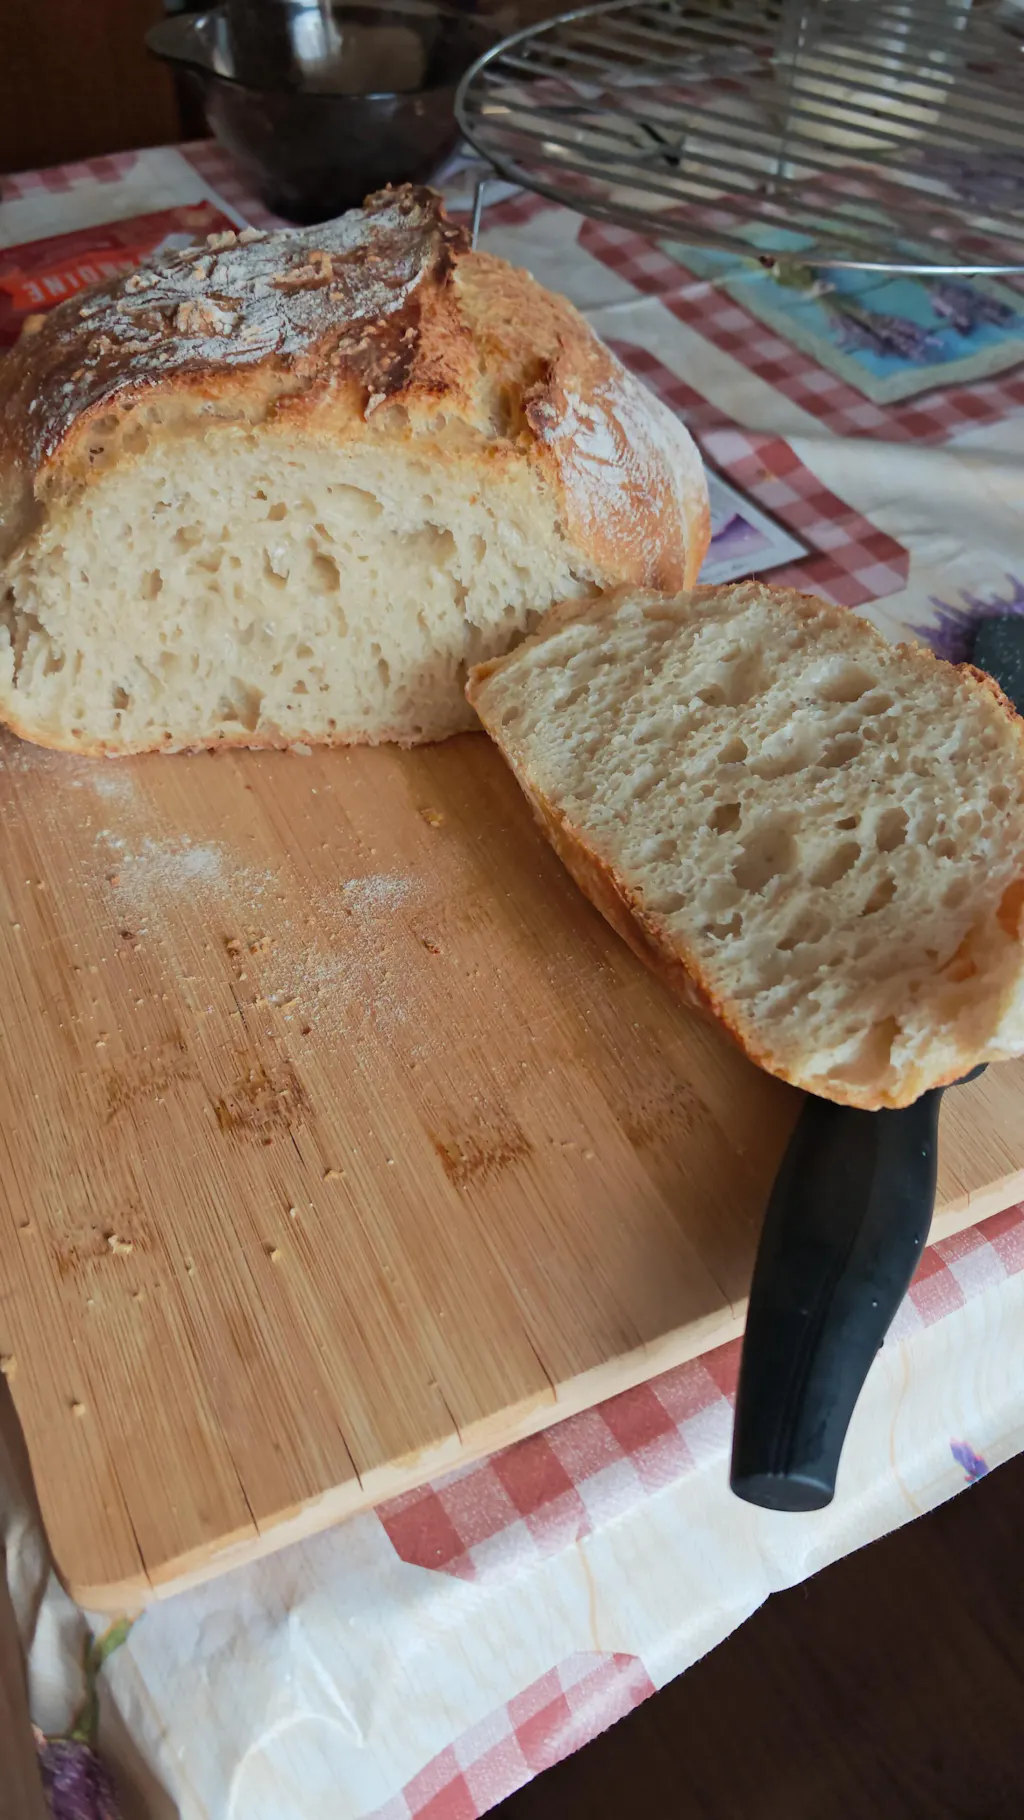
Under-proofed dough does not fully develop its internal structure, and the yeast does not produce enough carbon dioxide. The result? Dense bread with small holes. The crumb is heavy and moist, and the texture is more like a pound cake than airy bread.
In the oven, under-proofed dough does not rise enough, showing minimal oven spring. The bread remains flat, and the crust cracks uncontrollably because internal pressure exceeds the dough's weak structure.
How do you check? Press with your finger — if the indentation disappears immediately, the dough is under-proofed. Well-proofed dough will keep the indentation partially and slowly fill back in. Also, during bulk fermentation, volume should increase by 30-50%. If after 4-5 hours the dough looks almost the same as at the start, it is not ready for shaping.
Signs That the Dough Has Proofed Too Much
Over-proofed dough is just as problematic. It becomes soft, loses its shape, and shows large bubbles. The finger test shows no recovery, indicating excessive fermentation.
To the touch, over-proofed dough feels like an overinflated balloon, ready to burst. The surface may have large bubbles under the skin, a sign that the process has gone too far. During baking, such dough barely rises at all. The result is flat bread, with a dense, moist crumb in the center but large, uneven holes near the surface. The crust may be pale because the sugars needed for caramelization have already been used up.
Another clue is the smell: properly proofed dough has a pleasant, slightly sour, yeasty smell. If it smells too sour, like vinegar or alcohol, fermentation has gone past the optimal point.
How to Time Proofing Correctly
To avoid incorrect proofing, check the dough every 30-45 minutes. If the volume has increased by 30-50%, and the finger test shows slow recovery (partial filling in 3-5 seconds), proofing is optimal. Look for visible bubbles on the surface and sides.
At temperatures below 20°C, fermentation will be slower. In this case, you can leave the dough overnight in the refrigerator at 4-6°C for controlled fermentation of 12-16 hours. This method, called cold fermentation, develops more complex flavors and gives you more flexibility.
For final proofing, time varies depending on temperature: between 2-4 hours at room temperature or 8-12 hours in the refrigerator. A useful trick is to use a transparent container so you can observe how the dough rises along the sides. It is ready to bake when the volume has increased by 50-70%, and the finger test shows slow recovery.
On hot days, when the temperature exceeds 28°C, use cold water (10-15°C) for kneading. On cold days, place the dough near a radiator or in the turned-off oven with the light on, which keeps about 24-26°C.
Starter also plays an important role. A recently fed, active starter speeds up fermentation, while a weaker starter or one just taken out of the refrigerator slows the process. If you want a slower fermentation and more complex flavors, reduce the starter amount to 10-15% of the flour weight instead of 20-25%.
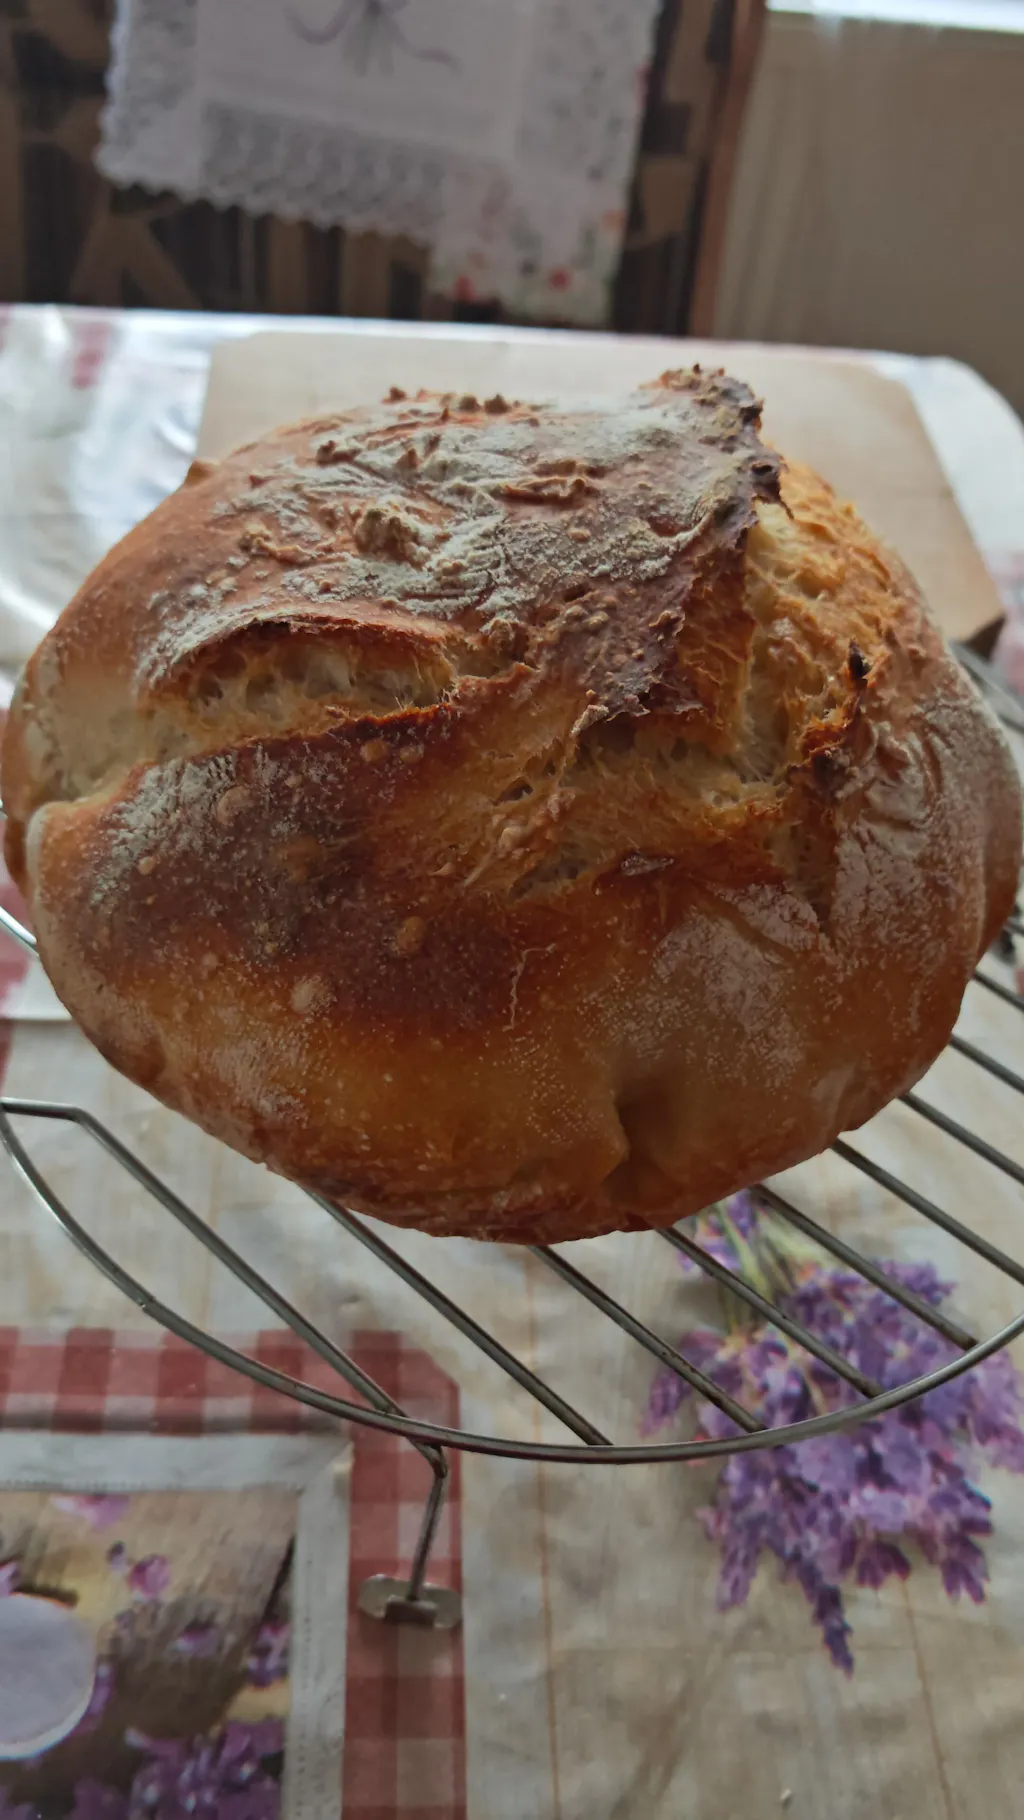
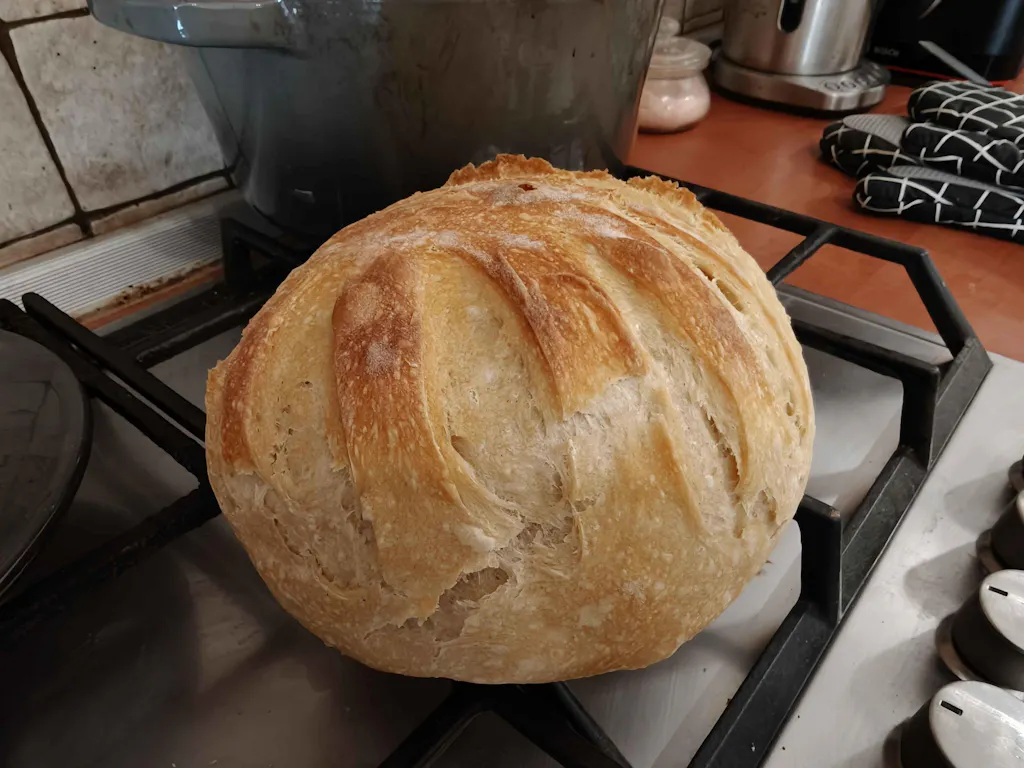
Mistake 6: Wrong Shaping Method
Once the dough has proofed, shaping comes next — an essential step for getting a round, airy, well-risen loaf. Shaping is not just about looks; it plays an important role in creating surface tension, which helps the dough rise beautifully in the oven. The result? A loaf with a tall shape, crisp crust, and airy crumb.
If shaping is done incorrectly, the bread may spread out instead of rising. Even if the starter is active, hydration is optimal, and proofing is correct, poor shaping can ruin the whole process. In such cases, the crust may crack in a chaotic way, and the crumb can become dense in certain areas. The so-called oven spring — the dramatic rise in the first minutes of baking — depends directly on how well the dough is shaped.
Proper shaping creates an elastic surface that traps gases and directs dough expansion. Without this tension, the dough collapses and loses its shape, like a deflated balloon. Just as temperature and hydration influence proofing, shaping plays a crucial role in turning those factors into the perfect loaf.
Common Shaping Mistakes
- Lack of surface tension: If the dough is handled too gently, the necessary tension does not form. Well-proofed dough requires firm but controlled handling.
- Over-kneading: This can remove the air accumulated during fermentation, destroying the internal dough structure and resulting in dense bread. Shaping involves folding and stretching, not continuous kneading.
- Too much flour on the work surface: Excess flour makes the dough slide, preventing tension from forming. The dough should lightly stick to the counter to allow proper stretching.
- Wrong timing: Shaping under-proofed dough can affect its structure, and over-proofed dough will tear and stick to your hands. Also, if shaping is rushed, the result will be an asymmetrical shape with varying thickness, leading to uneven baking.
Steps for Proper Shaping
Shaping includes two stages: pre-shaping and final shaping. The first stage prepares the dough by creating initial tension, and the final shaping gives it its shape and maximum tension.
-
Pre-shaping:
- Place the dough on a lightly floured surface, just enough to prevent sticking.
- Fold the dough edges toward the center, as if closing an envelope, then turn it over with the smooth side facing up.
- Let the dough rest for 20–30 minutes, covered with a damp towel. This pause allows the gluten to relax, making the next shaping easier.
-
Final shaping:
- For a round loaf (boule): Use the drag-and-turn technique. With your hands behind the dough, pull it toward you a few centimeters, then rotate it 90°. Repeat 8–10 times until the surface becomes smooth and taut. If the dough tears, it means you applied too much tension — try to be gentler.
- For an oval loaf (batard): Stretch the dough into a rectangle, then fold the top edge toward the center, sealing it lightly. Repeat until you get an oval shape, with the seam tightly closed underneath.
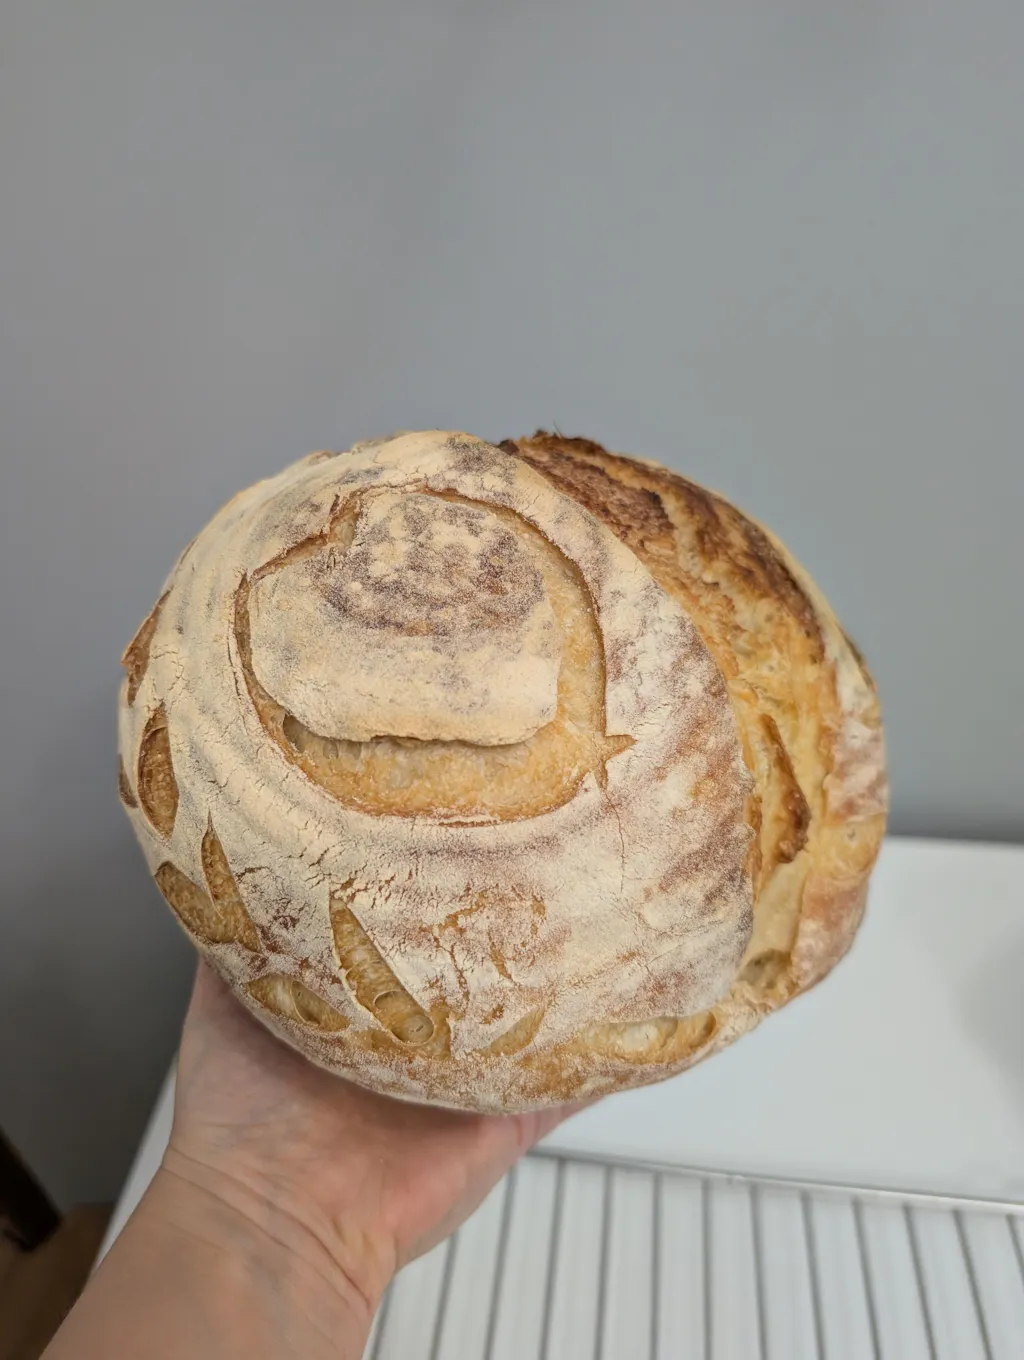
- The dough seam should always face downward in the proofing basket. That way, when you turn the dough out onto the baking sheet, the smooth surface will be ready for decorative cuts (scoring).
- For more control, use a bench scraper. Place it behind the dough and push it toward you, creating tension without extra effort.
- If the dough is sticky, wet your hands with cold water instead of adding flour, thus avoiding changes to the hydration.
After final shaping, place the dough in the proofing basket dusted with rice flour to prevent sticking. Make sure the tension created during shaping is visible and that the dough is ready for final proofing.
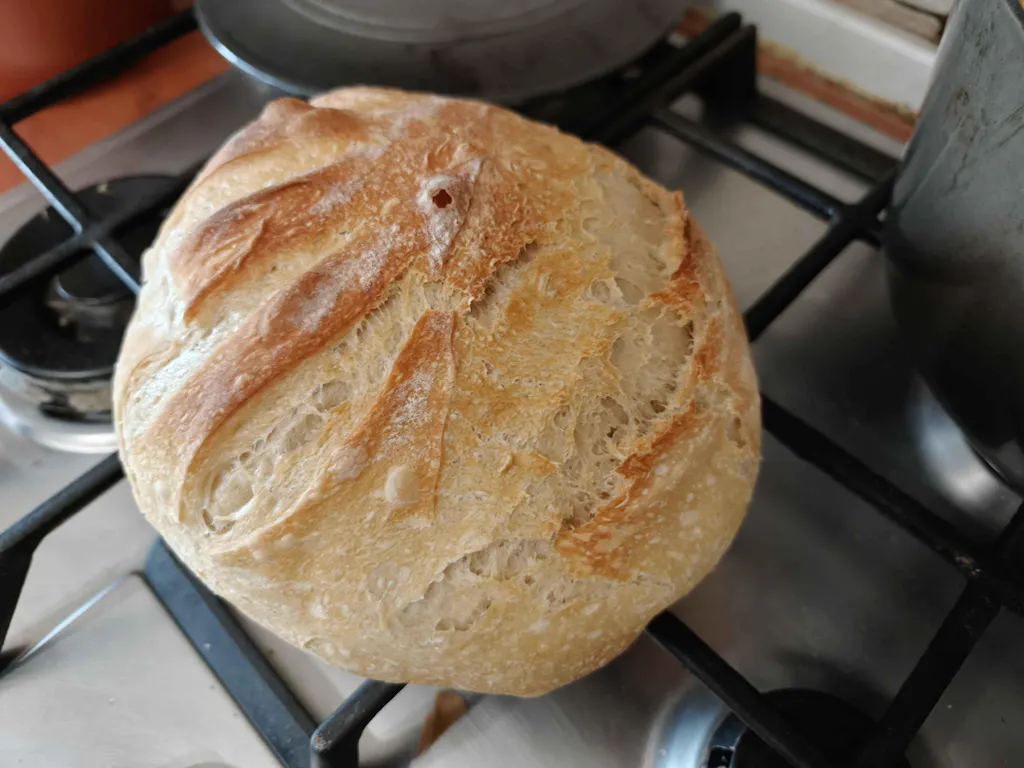
Mistake 7: Baking Problems (Temperature, Crust, Interior)
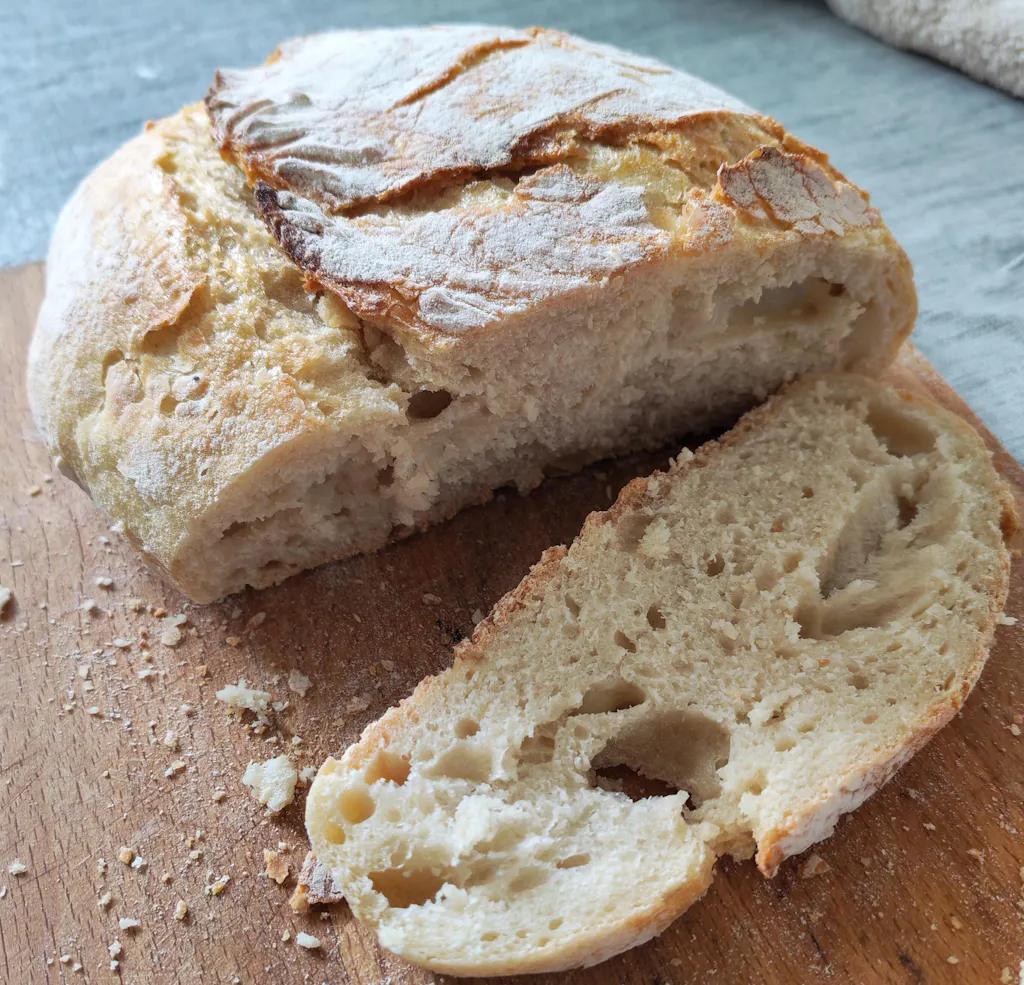
Once you've mastered shaping techniques, baking becomes the decisive step. No matter how well you've handled the previous stages, incorrect baking can ruin everything. Sourdough bread needs a high initial temperature to get that spectacular oven spring and a golden, crisp crust. Without enough heat, the dough will not rise properly, and the crust will stay pale and soft.
But temperature is not the only factor. Lack of steam in the first minutes of baking can prevent a perfect crust from forming, and underbaking leaves the crumb sticky and undercooked. Many people rush to remove the bread from the oven based only on the crust color, without checking the internal temperature. The result? Bread that looks good on the outside but is raw and dense inside.
Proper baking is what turns all the effort into success. Temperature, steam, and baking time must be balanced to achieve a crisp crust and a well-aerated crumb with the characteristic sourdough aroma.
Why Preheating the Oven Matters
Preheating the oven to 240°C for at least 20 minutes is essential. This level of heat allows the dough to expand quickly in the first 10–15 minutes, creating that spectacular oven spring. If you use a lidded cast iron pot (Dutch oven), it must be preheated together with the oven for 45–60 minutes. The pot stores and evenly distributes heat, mimicking the conditions of a professional oven with a baking stone.
If you use a baking stone, set the temperature 20°C higher than for convection ovens. The stone will absorb and radiate heat steadily, ensuring even baking and a crisp base. For smaller loaves, such as baguettes or rolls, higher temperatures help achieve a well-colored crust. On the other hand, dough retarded overnight (cold retardation) needs a lower temperature, by about 10°C, to prevent the crust from burning before the inside is cooked.
The Role of Steam in Crust Formation
Steam in the first 10–15 minutes of baking is crucial for a perfect crust. Without steam, the dough surface dries out too quickly, preventing rise and leading to a thick, hard crust.
The most effective method is to use a lidded cast iron pot. Preheat the pot to 240–250°C for 45–60 minutes, transfer the dough into the hot pot, cover with the lid, and bake for 15–20 minutes. The lid traps the moisture released by the bread, creating the ideal environment for oven spring and a well-formed crust. After this stage, remove the lid and reduce the temperature to 200–220°C so the crust becomes crisp and the inside cooks through.
If you don't have a cast iron pot, you can use a tray of boiling water placed on the lower rack of the oven. The steam generated in the first minutes helps form the crust. After this period, remove the tray so the crust can dry and become crisp.
Avoiding Undercooked Bread
Don't be fooled by the crust color. Check the bread's internal temperature with a thermometer — it should exceed 95°C to ensure the inside is fully baked. A sticky crumb indicates underbaking.
Even after you take the bread out of the oven, the process continues for about 3 hours. During this time, water evaporates, and starches and proteins set, contributing to the final texture. If you cut the bread too soon, you'll interrupt this process, and the crumb will remain moist and sticky.
Baking time varies depending on loaf size. A large round loaf needs 35–40 minutes at a lower temperature after the first steam stage. Smaller loaves bake faster. If the crust is coloring too quickly but the inside is not ready yet, cover the bread with aluminum foil during the last 10–15 minutes to prevent burning.
Another clue that the bread is done is the hollow sound it makes when you tap the bottom lightly. If the sound is dull, leave it in the oven for a few more minutes. After baking, let the bread cool completely on a rack so air can circulate and the crust stays crisp.
By following these techniques — precise temperature, steam, and proper baking time — you'll get a sourdough loaf that impresses every time.
Quick Guide: Mistakes and Solutions
Use this table to quickly identify common problems, their symptoms, causes, and possible solutions. It's a practical summary that complements the detailed information above, useful for bakers of all levels.
| Mistake | Symptoms | Main Causes | Solutions |
|---|---|---|---|
| Starter too active or too weak | Gray liquid (hooch) on the surface; starter that doesn't rise enough; bread doesn't rise properly | Poor-quality flour (chemically processed); low temperature; irregular feeding; using the starter at the wrong time | Choose organic, unbleached flour and filtered water; keep the temperature between 24–26°C; feed the starter regularly — pour off the hooch and feed with equal parts water and flour; for refrigerated starter, feed it 2–3 times at 12-hour intervals before use; check activity with the float test |
| Wrong kneading technique | Non-elastic dough; dense bread; crumb without airiness | Insufficiently developed gluten network; lack of oxygen in the dough | Replace aggressive kneading with the "stretch and fold" technique; perform 3 sets of stretches at 40-minute intervals, covering the dough between sets; this method improves elasticity and dough aeration |
| Temperature changes during fermentation | Too slow or too fast fermentation; uneven rise; uneven texture | Unstable or too low ambient temperature | Keep a constant temperature of 23–25°C for bulk fermentation; for slow proofing, leave the shaped dough in the refrigerator at about 7°C for 10–12 hours for better texture |
| Wrong water-flour ratio | Dough too sticky or too dry; dense or crumbly bread | Flour not suitable for gluten networks; inaccurate measurements | Choose flour with a high protein content (minimum 11.5%), such as Manitoba or type 650; weigh ingredients precisely; adjust the ratio based on dough consistency — it should be soft but not overly sticky |
| Proofing too long or too short | Bread that doesn't rise (under-proofed) or collapses and tastes sour (over-proofed) | Starter not active enough or too active; incorrect fermentation time | Check that the starter is at peak activity (doubled/tripled in volume, passes the float test) before mixing the dough; allow enough time for bulk fermentation (e.g. 2 hours at room temperature before refrigeration); for final proofing, refrigerate the shaped dough for 12 hours for slow rise; watch the dough's appearance and elasticity |
| Wrong shaping method | Bread spreads during baking; irregular shape; weak structure | Shaping without proper tension in the dough | After bulk fermentation, divide and pre-shape the dough into balls, letting them rest briefly; for final shaping, flatten and fold using the "stretch and fold" technique, then roll tightly to create tension; use a banneton to support the shape during proofing |
| Baking problems | Pale or burnt crust; bread doesn't rise; sticky or undercooked crumb | Unpreheated oven; lack of steam; wrong temperature; insufficient time | Preheat the oven to 240°C for at least 20 minutes; preheat the cast iron pot for 45–60 minutes; create steam during the first 10–15 minutes (using the pot lid or a tray of boiling water); make sure the bread's internal temperature exceeds 95°C; cool the bread completely for 3 hours before slicing; protect the crust with aluminum foil if it browns too quickly |
Keep in mind that these mistakes can interact with each other. Observe the dough carefully and adjust the process as you go, without relying only on the timer.
Conclusion
Making sourdough bread is a mix of science and art, where even the smallest mistakes can affect the final result. Still, with a little attention and patience, the seven most common errors can be avoided, and the process can become more predictable.
Patience is essential. Slow fermentations are what give bread its airy texture and unmistakable flavor. If you rush — whether by using the starter before it's active enough, shortening fermentation time, or shaping the dough carelessly — the result will suffer.
Pay attention to the details. Measure ingredients precisely, monitor the temperature, and adjust each stage based on the dough's consistency and volume. Every small detail, from temperature to proportions, matters and influences the final result.
Every attempt is a learning opportunity. Observe how the dough reacts to different conditions and ingredients. With each bake, you'll understand the process better and be closer to achieving that perfect loaf with a crisp crust, fluffy crumb, and complex flavor. Practice and constant adjustments will bring you closer to the sourdough bread you want.
FAQs
How can I tell if my starter is too active or not strong enough, and what can I do to fix it?
To check whether your starter is active enough, see if it doubles or even triples in volume a few hours after feeding. Another simple test is the float test: take a spoonful of starter and place it in a glass of water. If it floats, it's ready to use.
If you notice that the starter isn't rising enough, try adjusting the feeding ratio, use better-quality flour, or keep it at a constant temperature, ideally between 22-24°C. On the other hand, if the starter is too active and fermentation happens too quickly, try feeding it more often or storing it in a cooler place.
How can I tell if my dough is over-fermented or under-fermented, and what can I do to correct the proofing time?
An over-fermented dough will collapse, have large bubbles, and a strong sour smell, a sign that the process has gone too far. In contrast, an under-fermented dough will stay dense, not rise enough, and have a compact, not airy texture.
To control proofing time, it is essential to observe the dough closely and take kitchen temperature into account. In a warmer environment, with temperatures between 24 and 26°C, proofing will speed up. On the other hand, if the temperature drops below 20°C, the process will be slower. Adjust proofing time according to these conditions to get a well-balanced dough. Experiment until you find the ideal combination!
How can I create the right tension in the dough during shaping, and why is it essential for sourdough bread?
To get the right texture in the dough, you can use techniques such as stretching and folding (stretch and fold) or shaping by bringing the dough edges toward the center to form a firm ball. These methods help develop the gluten structure, preparing the dough for the fermentation process.
Tension in the dough plays a crucial role in ensuring even rise, a fluffy texture, and a well-defined bread shape. In addition, it helps form the golden, crisp crust characteristic of high-quality sourdough bread.